How To Get The Perfect Coffee Roast At Home
If you’re into coffee and have been grinding those roasted beans for a while, you’ve probably thought, “What if I try roasting my own coffee beans?”
Roasting coffee at home might seem tricky and a bit scary, but it really doesn’t have to be. Honestly, you can break it down in just a few easy steps.
As the coffee experts you trust, we'll help you out with everything you need, from the equipment and ingredients to a step-by-step roasting process. We’ll also share a list of the best types of green coffee beans for beginners.

Let's get you started on roasting your first batch of coffee beans at home!
|
Method |
Pros |
Cons |
|
Pan |
|
|
|
Oven |
|
|
|
Popcorn Popper (The BEST for Beginners) |
|
|
|
Dedicated Coffee Roaster |
|
|
4 Most Popular Methods to Roast Your Coffee At Home

Make sure your workspace has adequate ventilation before roasting your beans on every method below.
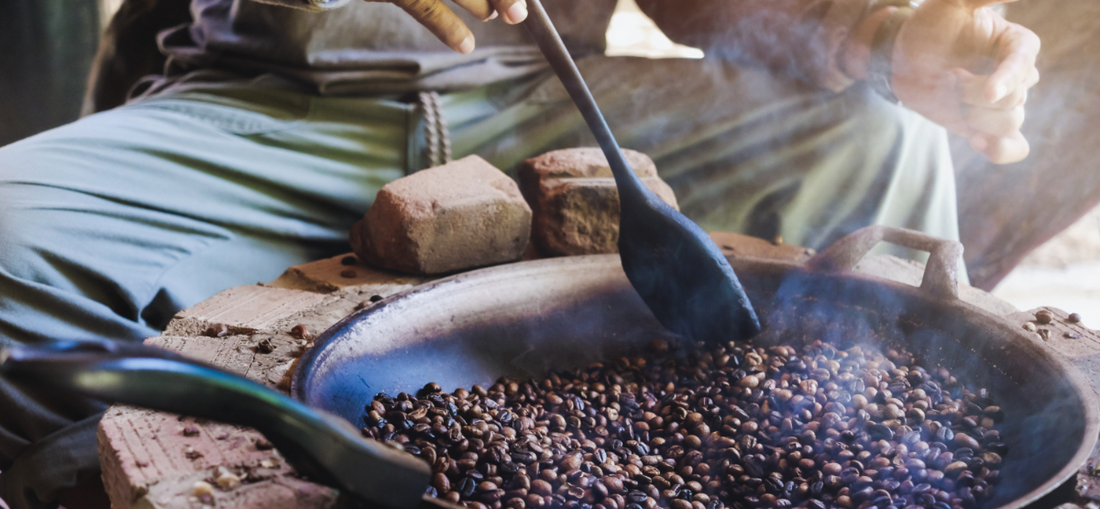
Roast your own coffee in the pan
Maybe you're not sure roasting is right for you and are searching for a method to test it out first. Well, pan roasting is a great way to do that.
What You’ll Need
1) Pan
Use whatever you already have. However, we recommend using aluminum or stainless steel pans. Cast iron pans are heavier and can be difficult to adjust when making heat changes on the fly.
2) Heat source
We recommend roasting your beans outside with a burner, so you don't have to sweep up a lot of chaff (that’s the papery outer skin of the bean) afterward.
3) Stirring Utensil
We prefer using a wire whisk. It captures more beans with each rotation, resulting in more efficient stirring, saving you from the extra hassle.

Steps in Roasting with a Pan:
1) Preheat the pan
Let your pan preheat for 4 to 5 minutes on medium-low to medium heat. Make sure the pan is evenly hot.
2) Add the green coffee beans
Start with half a cup to a cup. Consider using the same amount of beans each time to allow your roasting to be consistent with every batch.
3) Start stirring constantly
Use your whisk to consistently stir the beans for even roasting and to avoid burning the beans.
Find your perfect roast level below:
Light Roast
Time: Approx. 5-7 minutes
The beans turn a nice light brown, and you'll hear the first crack around 3 to 5 minutes, kind of like popcorn popping.
Medium Roast:
Time: Approx. 7-9 minutes
The beans now have a nice medium brown color and have completed their first crack. You might notice a bit of oil showing up on the surface of the beans.
Dark Roast:
Time: Approx. 9-11 minutes
The beans will turn a dark brown color, and you may hear a second, softer crackling sound. The beans will look a bit oily on the surface.
Never leave the pan unattended, as coffee beans burn quickly. Set a timer on your phone to find that perfect roast.
4) Remove the pan from the heat and pour into a colander
Once you reach your desired roast level, immediately remove the beans from the heat and pour them into the colander.
Stir or shake the colander to cool the beans quickly. While cooling, gently blow on the beans to remove the chaff, or you can shake the colander over a sink or a trash bin.
5) Let the beans rest
Let your roasted beans rest for 12 to 24 hours. In the "degassing" phase, you let the beans rest, which helps the carbon dioxide escape and the flavors fully develop.
6) Storing the beans
Store your roasted beans in an airtight container. Keep it away from heat, light, and moisture.

To ensure freshness on every sip, grind the beans just before brewing.
Roast your own coffee in the oven
Just like roasting with your pan, oven roasting also allows you to roast coffee beans with what you already have in your kitchen.
What makes it better than the pan roasting is that an oven can handle larger batches. Roasting coffee beans in the oven is a great way to cut down on how often you need to roast.
What You'll Need:
1) An oven
Ideally one with good temperature control.
2) A baking sheet or a perforated roasting pan
If you don't have a perforated pan, you can use parchment paper as a replacement.
3) Wooden spoon or spatula.
4) Colander or a metal bowl.
5) Oven mitts (safety first!)
Steps to Roast Your Beans in an Oven
1) Preheat the Oven
Preheat your oven to 450°F (230°C). If your oven's a bit too hot or not cooking evenly, you might want to kick things off at 400°F (205°C) instead.
2) Prepare the green beans
Start with about 1/2 to 1 cup for your first try. Spread the green coffee beans out on your perforated roasting pan or baking sheet.
Don't pile the beans on top of each other; arrange them in a single layer to ensure an even roasting.
3) Place the tray on the middle rack of your oven
Keep an eye on the beans throughout the whole process.
4) Stir the beans every 4 to 5 minutes
Pull the tray out and stir the beans with a wooden spoon or spatula. This removes the chaff and ensures even roasting.

Here's a timeline of each roast level:
Light Roast
Time: Approx. 8 to 10 minutes
It has the same indicators as pan-roasted beans. You'll hear a loud popping sound, and the beans will turn light brown. The aroma will fade into a more toasty, nutty smell.
Medium Roast
Time: Continue roasting for another 1 to 2 minutes.
The beans will turn medium brown and will still be dry.
Dark Roast
Time: Approx. 12 to 15 minutes
You'll hear the second crack, which is a quieter, more rapid popping sound.
The beans will become darker in color, and you'll start seeing oils on their surface. The aroma will have smoky or caramelized notes.
Return the tray quickly to the oven to maintain the temperature.
5) Remove the tray from the oven and cool the beans
Remove the tray immediately and transfer the beans to a colander or a large metal bowl.
Stir and shake the beans to release heat and remove the chaff.
6) Let the beans rest
As with other methods, let them rest for 12 to 24 hours to allow the carbon dioxide to escape and the flavor to settle.
Roast your own coffee in the popcorn popper (The BEST for Beginners)
Roasting green beans in a popcorn popper is best for beginners for so many reasons. For one, it's faster than ovens and pans. Secondly, it ensures a consistent heat distribution.
When roasting green beans with your oven or pan, you'll need to consistently stir your beans. With a popcorn machine, however, your hands are free. You'll only need to listen for the cracks, smell the aroma, and watch the beans' color change.
What You’ll Need
1) Popcorn popper
If you haven't bought one yet, choose a hot air popper with side vents at the bottom. Never buy poppers with mesh or bottom heating elements, as these models may burn the beans quickly or clog with chaff.
2) A large metal bowl or colander
3) Wooden spoon or spatula
4) A strainer or bowl
Use a strainer or bowl to catch chaff as it blows out for an easy clean-up.
Steps to Roast Your Beans in a Popcorn Machine
1) Preheat the machine
Plug in your popcorn machine and let it preheat for 30 seconds to a minute.
2) Pour the green coffee beans into the roasting chamber
The amount of coffee beans you'll use depends on your popcorn popper's capacity. However, start with 1/2 to 3/4 cup of green coffee beans, and make sure you don't overfill the roasting chamber.
3) Monitor them consistently
Depending on the amount of green beans you’ve added, they might not move freely, which could result in uneven roasting. This typically occurs during the first minute. To achieve an even roast, you may need to gently stir the beans with a wooden spoon.
The roasting process happens quickly in a popcorn popper, so pay attention to achieve your desired roast.
Light Roast
Time: Approx. 3 to 5 minutes
You'll hear a series of loud, crackling sounds signaling the first crack.
Like all light roasts, the beans will have a light brown color.
Medium Roast
Time: Continue roasting for another 1 to 2 minutes after the first crack.
The popping will slow, and the aroma will shift from grassy to a toasty, caramel-like smell.
Dark Roast
Time: Approx. 6 to 8 minutes.
You'll hear the quieter, rapid popping sound of the second crack. The beans will turn dark brown and may have a shiny, oily surface.
4) Pour the beans into a metal colander or a bowl
Stir or shake the beans to let them cool quickly and remove any remaining chaff.
5) Let the beans rest
As with all methods, allow the bean to degas for 12 to 24 hours.
Roast your own coffee in the home coffee roaster.

With precise controls and pre-programmed settings, you can easily recreate the delicious roasts you love from your favorite coffee bean shops. This helps you get great results every time you roast.
What You'll Need
1) Coffee Roaster
Choose the coffee roaster that aligns with your budget, batch size needs, and level of control desired (the temperature, time, and airflow adjustments, and other controls you prefer).
2) A scale
You might not need this necessarily, but it helps with consistent batch sizes and profiling.
3) Notebook or a roasting app
The fact that you spent hundreds of dollars on a coffee roaster shows how serious you are about roasting beans at home. To get consistent results and improve your craft, you need to keep track of roasting profiles, times, and settings.
4) Cooling tray or colander
Steps to Roast Your Beans in a Home Roaster (How to Roast Coffee Beans Professionally)
1) Set up the coffee roaster
Place the machine on a flat, stable surface and make sure it is in a well ventilated area.
2) Add the amount of green beans recommended for your roaster
Pour the beans into the roasting chamber, and make sure they are evenly distributed. Be sure to follow the manufacturer's guidelines on the quality of beans to add.
3) Preheat (only if your roaster requires it)
Check out the manual to see if your coffee roaster needs to be preheated. If you’re using a Behmor coffee roaster, you don’t need to worry about preheating. But we suggest preheating to cut down the roast time and get a nice, even roast that’s packed with flavor.
4) Start the roasting process
As a beginner, start with a moderate temperature (around 400°F/200°C).
Use the default settings to play it safe. You can adjust as the roast progresses.
5) Monitor the roast stages
Check out the beans while they roast. Most roasters come with a window or a clear chamber, letting you keep an eye on how their color changes.
Light Roast
Time: Approx. 5 to 7 minutes
You'll hear the first crack at this stage, and the beans will turn light brown.
Medium Roast
Time: Approx. 7 to 9 minutes
The beans' color will turn into a medium brown, and the aroma will become sweeter and richer.
Dark Roast
Time: Approx. 9 to 12 minutes
You'll notice the quicker crackling sound of the second crack at this point. When the oils make their way to the surface, the beans will look shiny and oily, showing off a dark brown color.

6) Cool the beans
Activate your roaster to cool the beans inside the chamber. If your roaster doesn't have a cooling cycle, just grab a colander and give the beans a good stir to cool them down fast. It is best practice to cool the beans quickly to stop the roasting process as the heat that they hold does continue to roast the beans.
7) Remove the chaff
See if your roaster has a built-in chaff collector. If it doesn't have one, gently blow or shake the cooled beans in your colander to remove the chaff.
Best Green Coffee Beans for First-Time Roasters

It can be hard to decide which green coffee beans to use when roasting coffee at home for the first time. The result of your roast depends on things like where the beans come from, what kind they are, and how they were processed.
We've done the research, and (as your trusted coffee experts) we can tell you that there are just two varieties of green beans that you should start with: Guatemalan or Colombian coffee green beans and when you are comfortable with that you should 100% try roasting Jamaican Blue Mountain green beans as they have unbeatable flavors and aromas.
And this is why these choices are the best:
Balanced Flavors: Both Jamaican Blue Mountain and Guatemalan coffee are known for having well-balanced flavors, which makes them easy for newbies to enjoy.
Versatility: They do well with different amounts of roasting, so you can try new things and learn.
These beans are a great choice as Colombian and Guatemalan are a good choice for beginners as they have a great taste and are cheaper, but for the best you can get, you need to try Jamaican Blue Mountain coffee.